How To Remotely Access Your Raspberry Pi: A Beginner's Guide
Are you tired of being tethered to your local network, yearning for the freedom to access your Raspberry Pi from anywhere in the world? The ability to connect to your Raspberry Pi remotely opens up a universe of possibilities, from controlling home automation systems to accessing personal projects and data while you're on the go.
The quest to connect to a Raspberry Pi from outside your local network can be a challenging one, often leading to frustration and dead ends. The internet is awash with tutorials, each offering a slightly different approach, and the jargon can be overwhelming for beginners. This guide aims to demystify the process, providing a clear, step-by-step approach that anyone can follow, regardless of their technical background. We'll explore the essential concepts, from port forwarding to SSH, and consider alternative methods, such as using ngrok, to make remote access a reality.
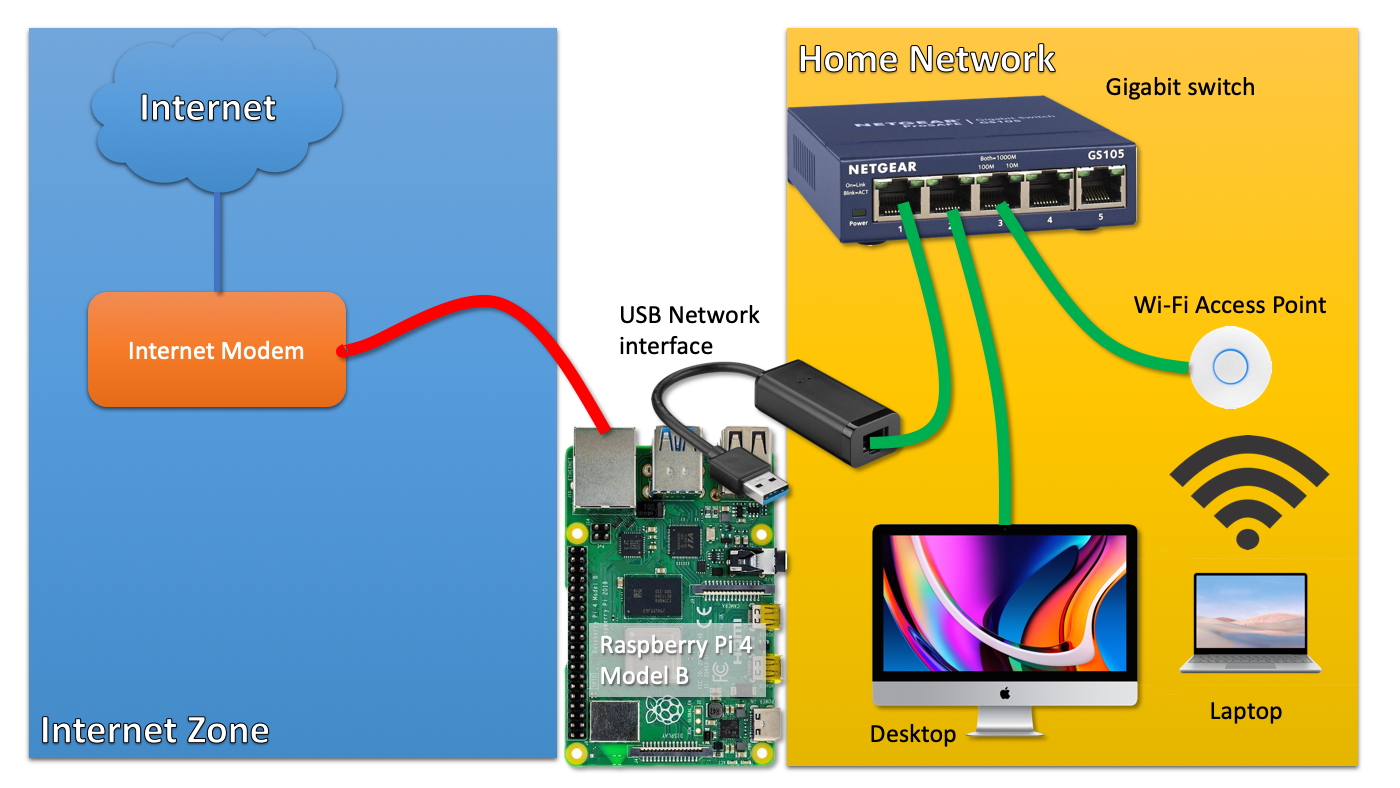
Before diving into the specifics, it's helpful to understand the fundamental challenge. Your Raspberry Pi, like most devices on your home network, has a local IP address. This address allows devices within your network to communicate with each other. However, this local address is not directly accessible from the internet. Your router acts as the gatekeeper, translating between your local network and the outside world. To connect to your Raspberry Pi from outside your network, you need to "punch a hole" through this gatekeeper, allowing traffic from the internet to reach your Pi.
| Topic | Details |
|---|---|
| Challenge: Accessing Raspberry Pi Remotely | Connecting to a Raspberry Pi outside of a local network is challenging. The Pi has a local IP address, not directly accessible from the internet. |
| Essential Concept: Port Forwarding | Requires punching a hole in the router, allowing external traffic to reach the Raspberry Pi. |
| Technology: SSH (Secure Shell) | A secure protocol for remote access and command-line control. |
| Technology: ngrok | A tool for creating temporary, secure tunnels to access the Pi. |
| Procedure: Router Configuration | Entering the router's IP address in a browser to access its admin panel. Locating the 'port forwarding' section. |
| Procedure: SSH Setup | Enabling SSH on the Raspberry Pi. |
| Procedure: Public IP address | Connecting to your router's outside IP when using Putty to connect to the Pi. |
| Tools used: VNC connect | Allows remote logging into the Raspberry Pi's full operating system. |
| Example Implementation: Raspberry Pi Pico W | Controlling LEDs via an HTML code with buttons, accessible locally. Expand accessibility remotely over the internet. |
Let's begin with the cornerstone of remote access: setting up port forwarding. This process allows your router to direct incoming traffic on a specific port to your Raspberry Pi. Think of it as creating a dedicated pathway for communication. The first step is to access your router's administration panel. You'll typically do this by entering your router's IP address into a web browser. This IP address is often found on a sticker on your router itself or in your operating system's network settings.
Once you've accessed the router's interface, look for the "port forwarding" section. This may be labeled slightly differently depending on your router model, but the concept remains the same. Within this section, you'll need to create a new rule. This rule will specify the port you want to forward (typically port 22 for SSH), the local IP address of your Raspberry Pi, and the protocol (usually TCP). The local IP address is the internal IP address assigned to your Raspberry Pi on your home network. You can usually find this by checking your router's connected devices list or by running the `ifconfig` command on your Raspberry Pi.
With port forwarding configured, the next step is to enable SSH (Secure Shell) on your Raspberry Pi. SSH is a secure protocol that allows you to remotely access the command line of your Raspberry Pi. This gives you full control over the system, enabling you to run commands, transfer files, and manage the Pi from a distance. SSH is typically enabled by default on recent Raspberry Pi OS versions. To verify that SSH is running, you can use a terminal window and try connecting using the command `ssh pi@`. If you can connect, it's working. If not, you'll need to enable it through the Raspberry Pi Configuration tool.
If you want to connect to the Pi via a tool like PuTTY from outside your LAN (Local Area Network), instead of connecting to the Pi's local IP, you'll connect to your router's public (outside) IP address. You can usually find this public IP address by checking your router status page, or by searching "what is my IP address" on the web. This public IP address is the address other devices on the internet will use to reach your home network.
When using PuTTY, you will need to configure a new session. In the "Host Name (or IP address)" field, enter your router's public IP address. Ensure that the "Port" field is set to 22 (the default SSH port), and that "Connection type" is set to SSH. Once configured, you can save this session for future use. You will be prompted for the username and password of your Raspberry Pi user account, and you'll have secure access to your Pi.
For those who find the manual configuration of port forwarding daunting, or for situations where you don't have direct control over the router, there are alternative methods. One such method is to use ngrok, a tool that creates a secure tunnel to your Raspberry Pi. Ngrok is relatively easy to set up and requires only a few commands in the terminal. It works by creating a temporary tunnel from your Raspberry Pi to the ngrok servers, allowing external devices to connect to your Pi without needing to configure port forwarding.
To use ngrok, you'll first need to sign up for a free account on the ngrok website and download the ngrok client for your Raspberry Pi's architecture. Once downloaded, you'll run the client from your Raspberry Pi's terminal. You'll need to specify the port you want to expose (usually port 22 for SSH) and authenticate with your ngrok auth token. Once the tunnel is established, ngrok will provide you with a public URL that you can use to access your Raspberry Pi from anywhere. This URL forwards all traffic to your Raspberry Pi via ngrok's servers.
Another option is to use VNC Connect, which enables remote login into your Raspberry Pi's full operating system. VNC has long been a primary method of remote access on the same network. However, VNC Connect is now designed to extend outside of the network. However, be aware that some of these options may have limitations in the free versions or require more advanced configuration for optimum security. Always research the security implications of any tool you choose to use. For instance, make sure you change the default password on the Pi and consider using SSH keys instead of passwords for increased security.
Consider a scenario where you're using a Raspberry Pi Pico W. You've set up an HTML code that allows you to control LEDs using buttons when connected to the Pi's IP address on your local network. But you want to control these LEDs remotely from the internet. By utilizing the steps outlined above, such as port forwarding, or tunneling tools like ngrok, you can make your Raspberry Pi Pico W accessible, allowing you to interact with your project from anywhere in the world. This capability unlocks possibilities for IoT applications and remote control, extending beyond the confines of your home network.
Regardless of the method you choose, securing your Raspberry Pi is crucial. Make sure to change the default password for the "pi" user. Use strong, unique passwords, and consider implementing SSH key-based authentication instead of password authentication for enhanced security. Regularly update your Raspberry Pi's operating system and software packages to patch any potential security vulnerabilities. Consider setting up a firewall on your Raspberry Pi to further control inbound and outbound traffic.
Remote access to your Raspberry Pi offers immense benefits, from providing access to your projects to enabling the administration of your devices remotely. However, it comes with the responsibility of securing your system. By following these steps, you'll be able to configure a secure and reliable connection to your Raspberry Pi from outside your local network. This will enable you to unlock remote access and control and open a vast world of possibilities.
For example, imagine you want to copy a file named `myfile.txt` from your personal computer to a user's home folder on your Raspberry Pi. You can do this with the `scp` command (secure copy), which uses SSH to securely transfer files. From the directory containing `myfile.txt`, run the following command, replacing the placeholder with your Raspberry Pi username (e.g., "pi") and the placeholder with your Raspberry Pi's IP address or your router's public IP address if connecting remotely:
bash scp myfile.txt pi@:/home/pi/
The Raspberry Pis compact size and affordability belie its immense capabilities as a versatile computing platform. Now, with the ability to connect from outside your local network, those capabilities are only amplified. So, take the steps to configure your Raspberry Pi for remote access and control, and explore the myriad possibilities that await you.

